Category Archives: How-To Articles
How To Gain Control Of Your Facebook Privacy Settings

I haven’t posted in a while but this article pushed all the right buttons, making me want to share this with anyone who listens.
Mashable.Com published a great article addressing how one can fully master the ever-changing Facebook Privacy Settings.
I don’t know about you but I have become increasingly frustrated with Facebook’s ever-evolving platform. It has been more than confusing – it is frustrating. And it compromises many of our existing Privacy Settings.
The article focuses on all the key privacy issues that pertain to us – like Photos, Followers, Timeline, Tagging, Apps ( I rarely login to Facebook via an App – just saying…), Likes etc. you name it – it’s there.
It is a cohesive and detailed summary so you need to set aside a quiet block of time for yourself to absorb the article and make the suggested changes.
However, isn’t your privacy worth the time and effort? Mine sure is. And remember, the ultimate privacy option is to simply post nothing at all. No pictures, no status updates nothing. But, there is no fun in that is there? Just be careful!
That being said – please join my Facebook Page. I may not know everything about the technological revolution, but, together, we can try to make sense of this exciting era in innovation.
Saturday Video Tutorial: A Look-See At The IMovie App For The IPad
I came across this great video tutorial about the amazing editing features of the iMovie IPad App.
It leaves out one small – or large – detail, depending whether or not you are a control freak, as am I,
If you are, then read this article after watching this excellent video.
Also, it gave me the idea to start a “how-to” category on the GrannieTheGeek.Com site – whether they be mine or someone else’s, such as Brennan Spark’s excellent video tutorial in this blog topic.
The important thing is to give readers quick access to technical assistance.
Now, I know many sites already provide this, but this site is aimed for the geeks in process – those who have a passion for technology as I do but have no idea where to start!
Are you an avid IMovie App fan? Do you have any other suggestions? I’m all ears – or fingers – so sock it to me in the comments section.
Also suggestion: Troubleshoot The Placement Of The Audio Clip In The IMovie IPad App
Troubleshooting The Placement Of The Audio Clip In The IMovie IPad App
You don’t need to take computer classes to find your way around Apple devices – although it does make the process a quicker one.
However, if you are semi-retired, as I am, with a ton of time on your hands to fiddle with your devices, you can easily problem-solve a technical issue or two.
Recently, when I was working on a family-themed video, I ran across a nagging and frustrating glitch in the IMovie App.

When I tried to insert audio of any kind, particular from my ITunes library, the music immediately snapped to the front of the video. And, unlike IMovie on the Mac, this audio clip could not be moved to a preferred placement in your video.
It was frustrating – I found it impossible to edit the length of the music backwards and forwards.

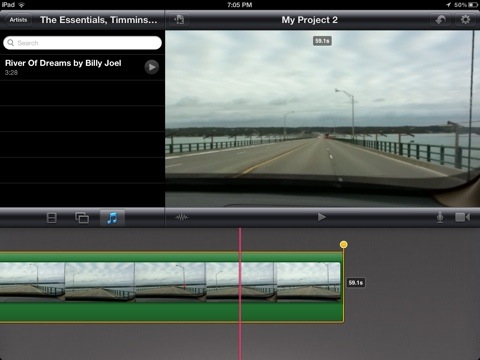
Then, I turned off the loop music function, selected the video clip and two yellow handles appeared. However, only the back handle ( the one on the right) was editable; the handle on the left would not budge. So the music could be re-positioned from the back and not the front? Strange.


I then split the clip where I wanted the music to begin, thinking that if I selected that clip before adding the audio clip, the music would place itself below the beginning of that clip.
No again! The music gabbed the entire video. Well, this was a nightmare!
So off I went to the Apple Store and posed my problem. However, six days later the creative team gave up and sent the problem to Cupertino. Did I find a glitch? Well, sort of.
Not one to give up easily, I continued to play around with the video, exploring every option and this is what I think is a pretty good work around until Apple addresses this issue.
The Fix:
Once again, I split my video in two, but this time, I decided to add the music twice – one to the first clip and the other to the second. But, at first this did not work.
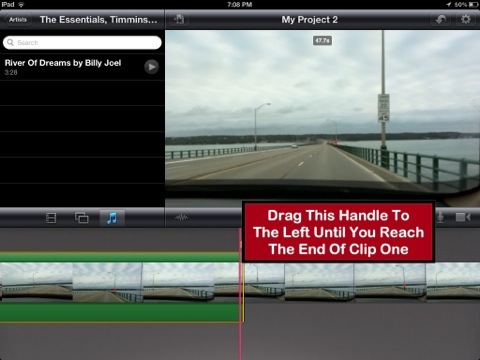
The audio insisted on attaching itself to both video clips, I had to grab the back handle of the audio clip and move it all the way forward to the end of the first clip.


Then, because I didn’t want to hear the audio in this first clip, I double clicked the audio clip to bring up the audio features and turned down the volume all the way to the left. Alternatively, one could also just set the audio to the “off”position. So, although the music was there, one could not hear it.
Now I was left with the second clip minus the audio. Because this is where I wanted the music to originally start, would adding the audio a second time ignore the first clip with the silent audio track and jump to the second? One way to find out! Just do it!

I selected my song from the ITunes library and, wonder of wonders, it grabbed the beginning of the second clip. Praise the Lord, Hallelujah! Then I adjusted the audio level for the music on the second clip, making sure that the music was at an appropriate audio level to compliment the people speaking in the video.
And, that was that! Looking at the written word, it all seems so simple and usually these problems are. However, it took a while to get past what I could easily do on my Mac where one can just move the audio to the correct placement.
Hopefully, Apple will issue an update to address this technical issue in the IMovie App. If one can shorten the video from the back end, one should be able to move the front end to any point in the movie. It should just work, right?
Creating Memorable, Frame-Worthy Photos On The IPad Or IPhone

I love printing pictures of family members and then framing them for all to see and enjoy. It has become a full-time passion for me.
I am sure many of you enjoy it as well. So, I decided to share some tips on making what I think are spectacular pictures to hang on your wall.

Also, I decided to use a picture of Steve Jobs to demonstrate my work. I am a stickler for privacy here, so my personal pictures, unfortunately, are inaccessible for mainstream internet.
First of all, if you don’t have all your best photos on your IPhone or IPad, it is best to transfer them from your computer to the Photo App on your chosen device.
There are many ways to do so and ICloud has made this very easy. However, for those of you who do not have ICloud and/or want to use less current pictures, there is a wonderful App out there called PhotoSync
I first learned of PhotoSync from my friends at IPhoneInCanada.Ca. It has been a lifesaver for me, seamlessly and wirelessly transferring photos and videos between computers and devices.
And as a bonus, the PhotoSync Companion is available for Windows or Mac OS X
Plus, it comes packed with features aplenty.
The Mobile Apps are also quick and easy to install on your IPad or IPhone.
Then, once the transfer process is complete, you can further refine your photos before you add additional enhancements.

So, I always access a solid image editing tool like Photoshop Express for IPhone or IPad. It has the basic but all-important tool refinements like, noise reduction, sharpening, exposure, contrast, crop, rotate.
I am big on Noise Reduction. It is a thorough cleanser for the majority of pictures, adding a smooth, flawless texture. And the cropping feature is an important element as well. I used both on the Steve Jobs photo, pictured above.

Then, if you want to get down and funky, download the Camera+ App for IPhone. Unfortunately, there isn’t an IPad App for this photo imaging tool, but the IPhone version is just as efficient on the IPad.
You can achieve some really neat looks with the various options available via this neat image editor. I just love it. But be forewarned-it is terribly addicting.
For the Steve Jobs picture, I used the Diana effect with 84% intensity. But, there were many, many choices within this wonderful App. Just you wait!
And, save many different versions of the same picture. You’ll be glad you did. Depending on the color of your chosen frame, one version of an edited picture may work better than others.
Following this, the fun truly begins. There is a wonderful framing App out there call Imikimi for IPhone and IPad. Once downloaded, you will be treated to vast array of categories to suit every mood or event.
I can’t stress enough how exceptional this App is-it is the closest thing I have seen to digital scrapbooking.

You simply select a photo from your photo library and add it to the empty square box in the frame. Once you do so, you have more options at your disposal to position or enhance the picture.

I often save many different versions within the Imikimi App so I don’t clutter up my Photo App, but you can easily save all your framing projects to the Photo App on your IPad or IPhone.
If there is one drawback to Imikimi, it is the fact that the vast majority of the frames are sized for a square photo, as opposed to a 4×6 or 5×7 etc. Up in my neck of the woods, I found fairly reasonable frames at Michaels, but, depending where you live, you may have more options for purchasing these frames.
And the square formation is perfect for scrapbooking. It is totally your call.
Once you are done, you merely have to print out your picture, using premium photo paper of course.
Let the ink dry overnight, pop it into the frame or scrapbook and you are done. Except for the squeals of delight on the faces of family members and friends once they see your digital work!
Happy Framing! Happy Scrapbooking! And please leave your ideas and thoughts in the comments section.
